|
One of the Most Useful Tesujis by Richard Bozulich May 6, 2024 |
|
The hane is one of the top five tesujis. It is effectively used in life-and-death positions where it can decrease the size of an opposing group's eye space, leaving it vulnerable to a placement tesuji which leaves it with only one eye. A hane can also be used to expand the size of your own eye space to ensure that it can get two eyes.
The hane is also useful in capturing races where it can decrease the number of liberties an opposing group has and, in effect, increase the number of liberties your own group has. The hane is also a key tesuji for many tactical and strategic objectives, such as linking up stones, making good shape, and saving an endangered group by escaping into the center, Below are eleven examples which can also be considered as problems. |
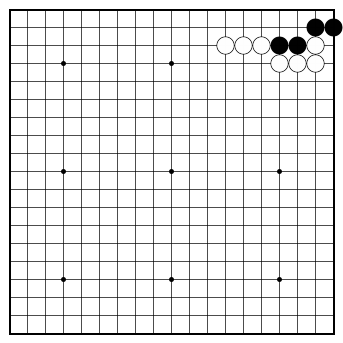
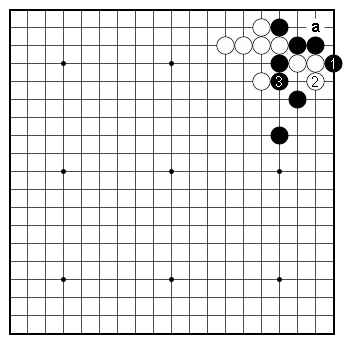
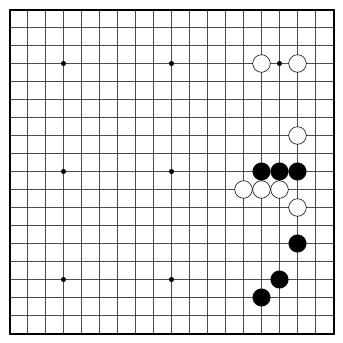
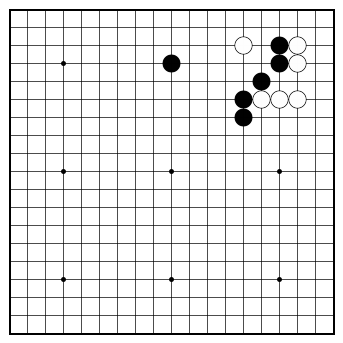
 Example 1. Black to play
 |
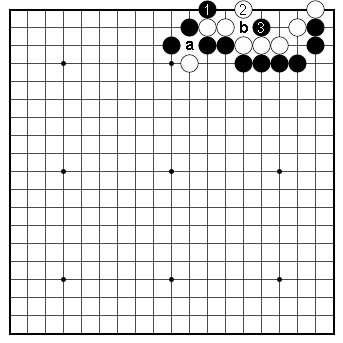
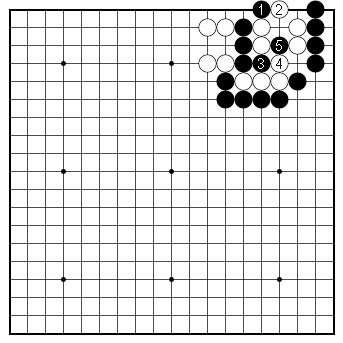
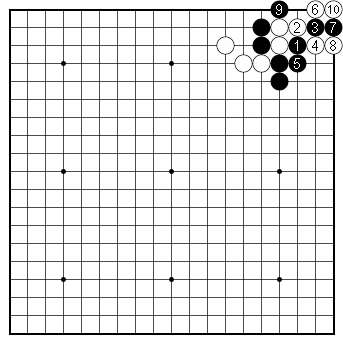
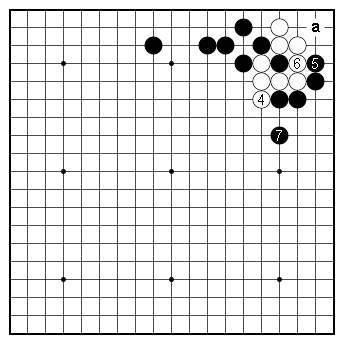
Example 1. Black to play and kill This is a typical life-and-death position in which Black can kill the white group using the standard hane/placement combination. However, Black must take into account the threat of white move at 'a'. |
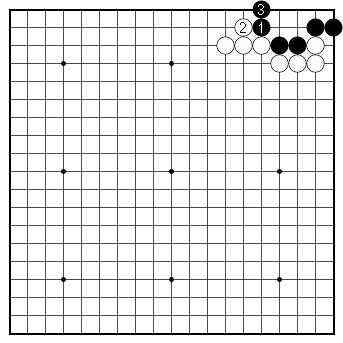
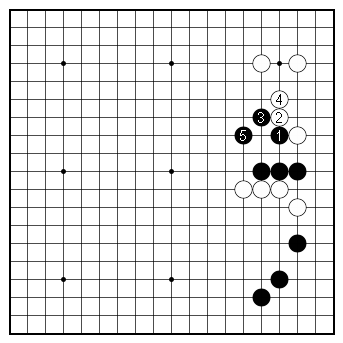
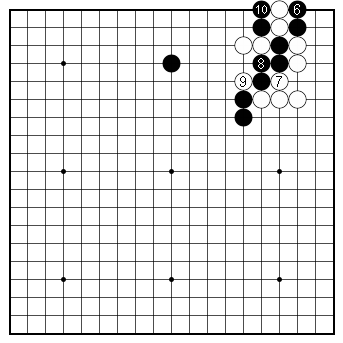
 Dia. 1. Killing with a hane |
Dia. 1. Killing with a hane Black 1 narrows White's eye space. White answer with 2, but he is left with a dead five-space eye. Black now plays on the key point of 3 and White can't make two eyes. If White 'a' next, Black ataries at 'b' and captures two stones before White can do any damage. |
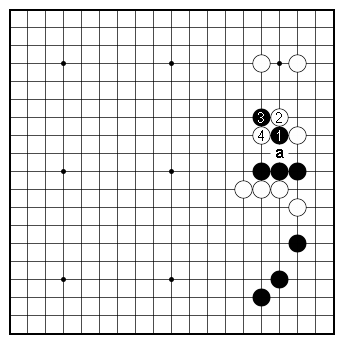
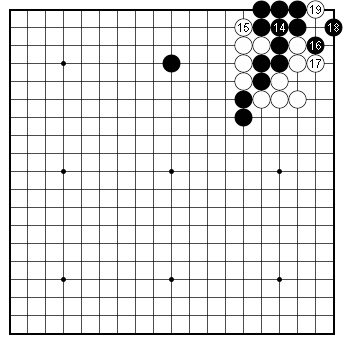
 Dia. 2. Only one eye |
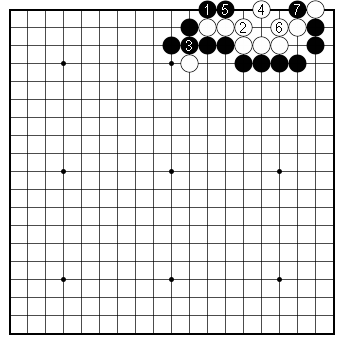
Dia. 2. Only one eye Suppose White answer Black 1 with the solid connection of 2. A white move at 3 now becomes a serious threat, so Black must connect. If White tries to make eye shape with 4, Black plays at 5. If White 6 next, Black 7. If White 6 at 7, Black plays at 6. However White plays, he has only one eye. |
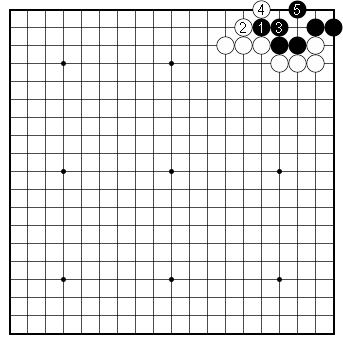
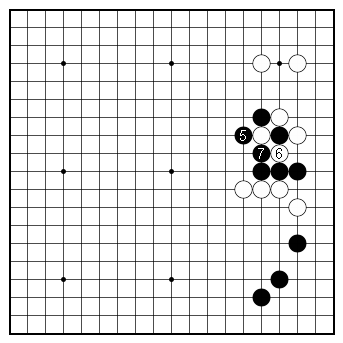
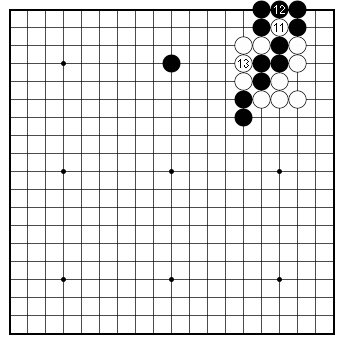
 Dia. 3. A dead eye space |
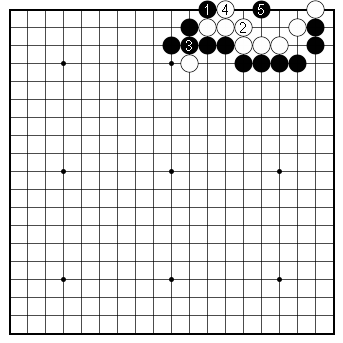
Dia. 3. A dead eye space After Black connects at 3, playing at 4 leaves White with a dead five-space eye. Black immediately plays on the key point with the placement of 5. There is no longer any way that White can make two eyes. |
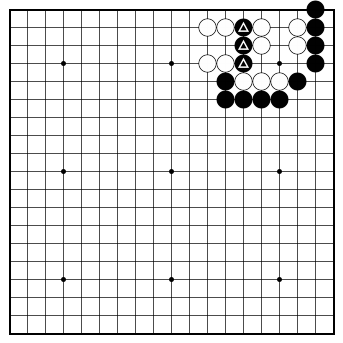
 Dia. 4. Black fails. |
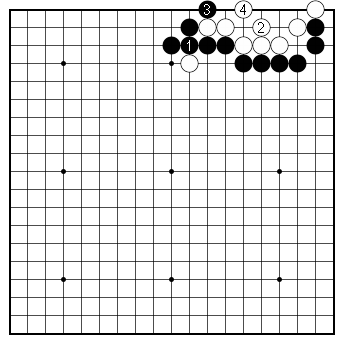
Dia. 4. Black fails. Black must not fear White's peep and connect at 1. After White 2, the hane of Black 3 no longer threatens to kill White. After 4, White's group is rich in eyes. |
 Example 2. Black to play and live
 |
Example 2. Black to play and live This is a simply life and death position, but there are two ways to live. Which way is the most profitable? |
 Dia. 1. Five points of territory |
Dia. 1. Five points of territory Black expands his eye space with the hane of 1. After White blocks with 2, descending to Black 3 is the correct response. Black will end up with five points of territory. |
 Dia. 2. Three points of territory |
Dia. 2. Three points of territory Many players would unthinkingly connect at 3 in reponse to White 2. In that case, White would hane at 4 and Black would live with 5. But Black is left wth only three points of territory instead of the five points he got in Dia. 1. |
 Example 3. Rescue the marked stones!
 |
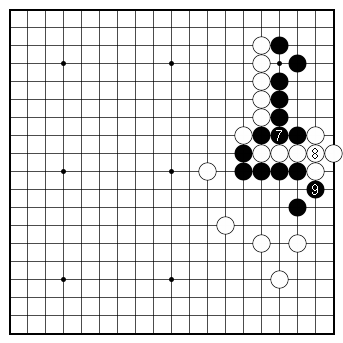
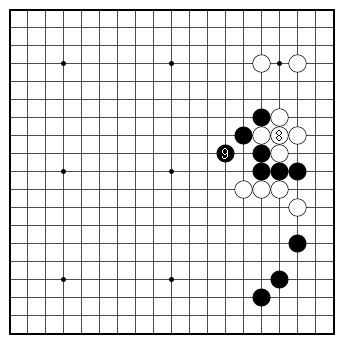
Example 3. Rescue the marked stones! Here is an example of the effectiveness of a hane in a capturing race. Black's marked stones are stranded inside White's stronghold. Is there a way to rescue them? |
 Dia. 1. Double atari |
Dia. 1. Double atari The hane of Black 1 is the tesuji. If White blocks with 2, Black pushes in with 3. White blocks with 4, but Black 5 is a double atari. Next — |
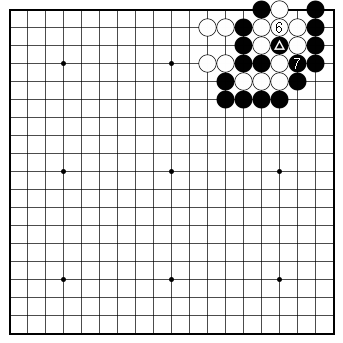 Dia. 2. Short of liberties |
Dia. 2. Short of liberties White captures with 6 and Black ataries with 7. White can't connect at the marked stone because he is short of liberties, so — |
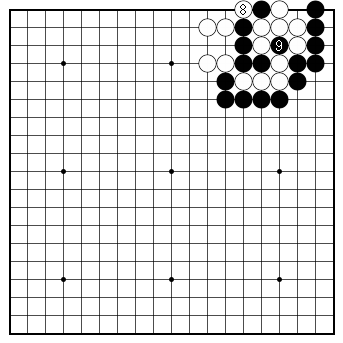 Dia. 3. Black rescues his stones. |
Dia. 3. Black rescues his stones. White captures a stone with 8 and Black captures four stones with 9, rescuing his stones on the left. |
 Example 4. Black to settle his stones
 |
Example 4. Black to settle his stones Black's four stones on the lower right are under attack. Black could problably run away and make eye shape in the center, but White would have gained a great advantage while attacking. If possible, Black would like to settle these stones in one quick maneuver. Is there such a way? |
 Dia. 1. The throw-in tesuji |
Dia. 1. The throw-in tesuji Black should hane with 1, then cut with 3. If White ataries with 4, Black throws in a stone with 5. White can't capture this stone, as he is short of liberties; he can only capture with 6. Next — |
 Dia. 2. White is captured. |
Dia. 2. White is captured. Black ataries with 7, then blocks with 9. Black has cut off a group of white stones and they do not have room to make two eyes. |
 Dia. 3. Resistance |
Dia. 3. Resistance Answering the hane of Black 1 by turning with 2 is White's strongest resistance, but he has to be careful. Black's best moves are 3 and 5. At this point White should realize that Black's groups are linked up and take sente, playing at 'a' only when Black fills a liberty. However, if White persists — |
 Dia. 4. Black rescues his stones. |
Dia. 4. Black links up his stones. White can play 6 and 8, threatening to separate Black's stones, then connect at 10. Black must defend the right side with 11, so White still ends in sente. The drawback for White in playing these moves is that he loses ko threats. |
 Example 5. Two weak groups
 |
Example 5. Two weak groups Black is split into two weak groups. If he can link them up, he will have no trouble living. with both of them. Where should Black play? |
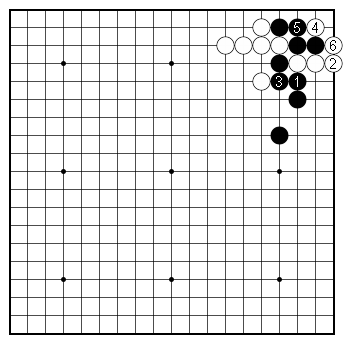
 Dia. 1. The hane tesuji |
Dia. 1. The hane tesuji The hane of Black 1 is the key point. White must cut and capture with 2 and 4. After Black ataries with 5, his stones are secure. |
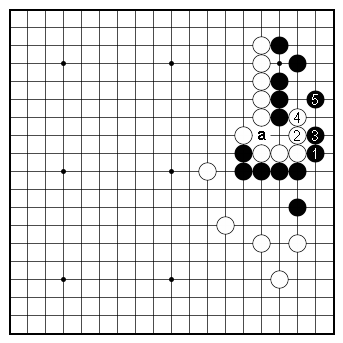
 Dia. 2. Resistance |
Dia. 2. Resistance White might resist by turning with 2. In that case, Black will draw back with 3. If White is going to save his three stones he will have to capture Black's stones in the corner. A move at 'a' seems to create the greatest complications for Black. For example — |
 Dia. 3. A capturing race |
Dia. 3. A capturing race White attaches at 4, then ataries with 6. It is now a capturing race between the four white stones on the right and Black's group in the corner. White 8 and 10 prevent Black from making two eyes. Next — |
 Dia. 4. Black has more liberties. |
Dia. 4. Black has more liberties. Black 11 captures two stones and White connects at 12. Black 15 puts four stones into atari, but Black still has two liberties remaining. |
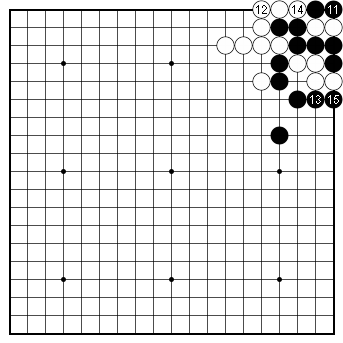
 Dia. 5. Black rescues his stones. |
Dia. 5. Black captures four stones. White ataries with 16 and Black captures with 17. |
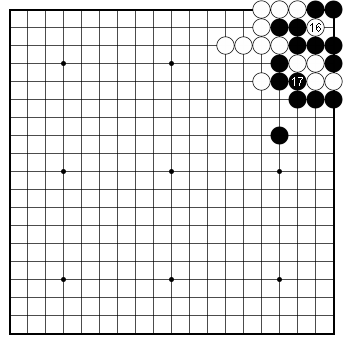
 Dia. 6. The corner is all Black's. |
Dia. 6. The corner is all Black's. White captures the two stones in the corner with 18, but Black can throw in a stone at the marked stones. If White captures that stone, Black can again play at the marked stone and capture three stones. |
 Dia. 7. A mistake |
Dia. 7. A mistake Black 1 is a mistake. White will descend to 2, then attach at 4. When Black connects at 5, White links up with 6 and will capture the four black stones in the corner. |
 Dia. 8. Black secures the corner. |
Dia. 8. Black secures the corner. Black can easily live in the corner with 1 and 3, but now Black has to find a way to secure his two stones below. |
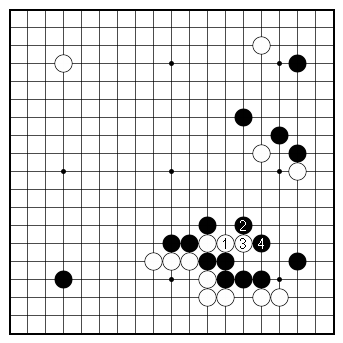
 Example 6. Under attack
 |
Example 5. Under Attack Black's three eyeless stones in the middle of the right side are under attack. How can Black make shape for them? |
 Dia. 1. The hane tesuji |
Dia. 1. First attach If you need to make shape, attaching is often the first move you have to play. After the exchange of 1 for White 2, the key move is the hane of Black 3. If White extends to 4, Black makes shape with the diagonal connection of 5. Black has settled his stones and he can now look for a chance to attack white's four stones below. Instead of White 4 — |
 Dia. 2. Resistance |
Dia. 2. Resistance White might fight back with the atari of 4. Clearly, Black must not connect at 'a'. Instead — |
 Dia. 3. Sacrifice |
Dia. 3. Sacrifice Black must atari with 5, sacrificing a stone, then atari again with 7. Next — |
 Dia. 4. Even better for Black |
Dia. 4. Even better for Black Assuming that White has no substantial ko threats, he will connect at 8, so Black can again make shape with the diagonal connection of 9. This result is even better for Black than Dia. 1 as the four white stones below are under greater pressure. |
 Example 7. Under attack
 |
Example 7. Under Attack Black has just attached with the marked stone, attacking the two white stones. How should White respond? |
 Dia. 1. The hane tesuji |
Dia. 1. The hane tesuji The hane of White 1 is the tesuji. It prevents Black from linking up his stones and threatens to establish a position within Black's moyo above. Blocking with 2 is Black's only defense. Next, White ataries with 3, then hanes with 5. The moves to White 9 can be expected. White has escaped into the center with good shape. Even though Black has staked out a moyo in the upper right, it is not as big as it may first appear because Black's moyo is open at 'a'. Instead of White 1 — |
 Dia. 2. Mistake |
Dia. 2. Mistake Descending to White 1 may stop Black's stones from linking up, but it does nothing to help White make shape. In addition, it is gote, so Black can attack with 2 and 4, and White's group is in serious trouble. |
 Example 8. A defect
 |
Example 8. A defect Black has staked out a moyo at the top. However, there is a defect in the wall backing up this moyo. How can White break through this wall and lay waste to Black's moyo? |
 Dia. 1. Hane and cut |
Dia. 1. Hane and cut White should hane and cut with 1 and 3, expecting Black to atari at 4. However, White has a nice tesuji to counter this move. |
 Dia. 2. The descent |
Dia. 2. The descent White descends to 5. Black has no choice but to connect at 6 in order to salvage what is left of his position, so White can secure territory at the top with 7 and Black's moyo has been destroyed. Instead of Black 6 — |
 Dia. 3. Fighting on. |
Dia. 3. Fighting on If Black continues to fight on with 6, White plays 7, then cuts with 9 and Black captures two stones with 10. Next, there is an important tesuji that White must play. |
 Dia. 4. The throw-in tesuji |
Dia. 4. The throw-in tesuji The throw-in tesuji of White 11 is another key move in this sequence. It is an atari, so Black must capture with 12. White now ataries with 13. Next — |
 Dia. 5. A capturing race |
Dia. 5. A capturing race Black has to connect at 14. With 15, it becomes a capturing race, with White clearly ahead. Black tries to make eyes in the corner with 16 and 18, but White 19 kills the Black group. The moves from White 5 in Dia. 2 to White 15 in Dia. 5, is known as the 'tombtone squeeze'. |
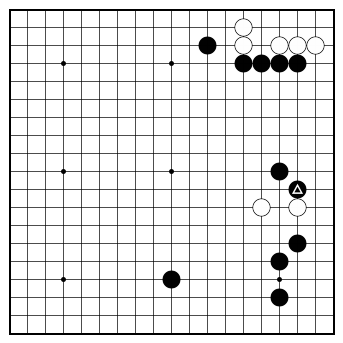
 Example 9. A capturing race
 |
Example 9. A capturing race The two black stones and the two white stones at the top are caught up in a capturing race. Each has three liberties, but it is Black's turn to move, so he has the advantage. However, White has a lot of chances to create complications in the corner, so Black must be careful how he plays. |
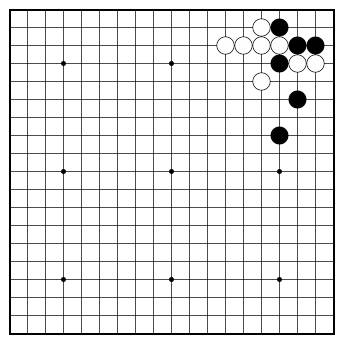
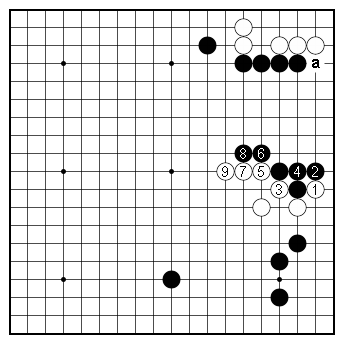
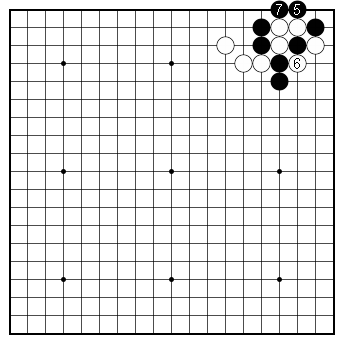
 Dia. 1. The two-step hane |
Dia. 1. The two-step hane Black should hane at 1, then hane again with 3. This two-move combination is called a two-step hane (two successive hanes). White responds with an atari at 4 and another atari at 6, intending to capture the stone at 3. But Back defiantly descends to 7, setting up the 'tombstone sqeeze'. After White captures with 10 — |
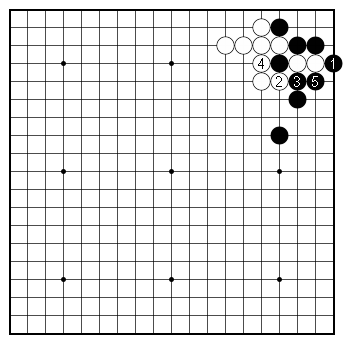
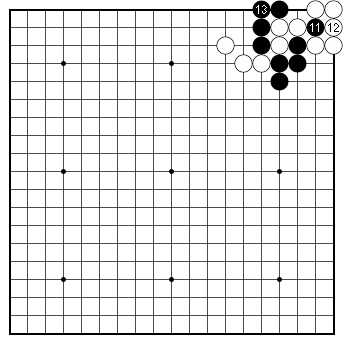 Dia. 2. The throw-in tesuji |
Dia. 2. The throw-in tesuji Black throws in a stone with 11, forcing Black to capture with 12. But, after Black connects at 13, White has no way to rescue his stones in the corner. Instead of Black 5 in Dia. 1 — |
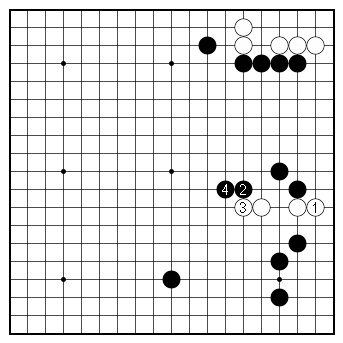
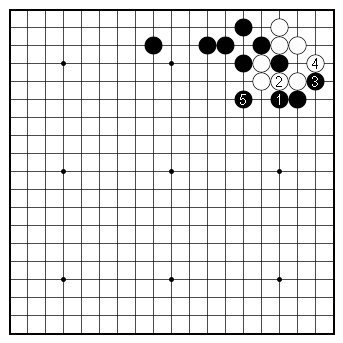
 Dia. 3. Squeezing is a mistake |
Dia. 3. Squeezing is a mistake Black might squeeze White with 5 and 7. But this is a mistake. Next — |
 Dia. 4. Continuation |
Dia. 4. Continuation After White connects at 8, a difficult capturing race ensues. With the moves to 17, Black manages to capture two stones, but the main battle at top is won by White, as he captures two stones and the corner with 16. |
 Example 10. Expanding down the side
 |
Example 10. Expanding down the side White would like to expand down the right side. How can Black prevent this? |
 Dia. 1. Short of liberties |
Dia. 1. Short of liberties Black should first force by peeping at 1. White must answer with 2, Black can now play the hane of 3. This is the key move. If White defends the corner with 4, Black casts a net by jumping to 5, confining White to the corner. White can't break out because his stones are short of liberties. In contrast, Black's stones project influence throughout the board. |
 Dia. 2. Black has the initiative. |
Dia. 2. Black has the initiative. Instead of 4 in Dia. 1, White might move out into the center with 4. In this case, Black will force with 5, then extend to 7, establishing a position on the right side. Black is now threatening to play at 'a', depriving White of his second eye and creating a weak group. If White secures the corner with his next move, he ends in gote, so Black has the initiative. |
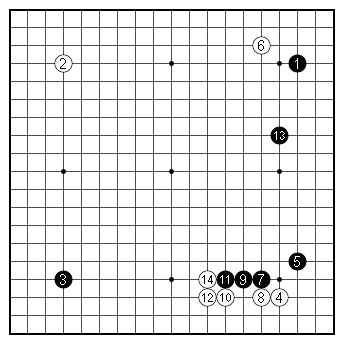 Figure 1 (1–14). Pressing
 |
Figure 1 (1–14 ). Pressing This final example comes from a game played in the preliminaries of the 2024 Ryusei (Dragon Star) tournament between Ueno Asami 5-dan (black) and Anzai Toshimasa 7-dan. Ueno is one of the female stars of Japanese go. She currently holds the woman's Meijin title and is the only woman to have won a major Japanese title open to both men and women, the 48th King of New Stars. She is known for her aggressive style of play, which has earned her the nickname 'The Hammer'. Nowadays the pressing moves of Black 7 and 9 are often seen. Continuing with the exchange of 11 for 12 is also frequently played. We would now expect Black to continue with 13 at 14, but Black suddenly switches to the upper right side and plays a wide extension to 13. Black responds by taking the key point of 14. |
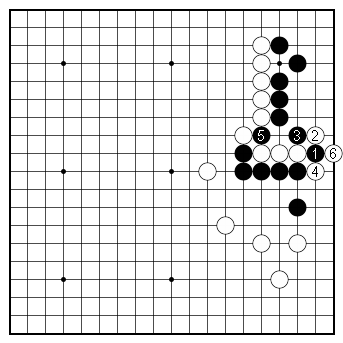
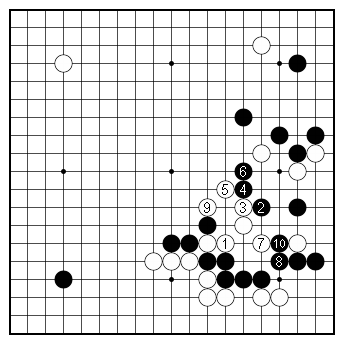
 Figure 2 (15–16). Hane is the only move. |
Figure 2 (15–16). Hane is the only move. It is hard to imagine Black playing any other move but the hane of 15. With the marked stone placed far up the right side, Black must expand her moyo on as wide a scale as possible. After White 16 — |
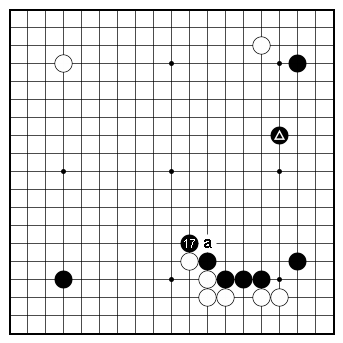 Figure 3 (17). The two-step hane |
Figure 3 (17). The two-step hane The two-step hane of Black 17 highlights Ueno's aggressive style. With the wide extension of the marked stone in mind. She wants to make the influence of her wall as all encompassing as possible. Extending to 'a' instead would be submisssive; White would push up at 17. |
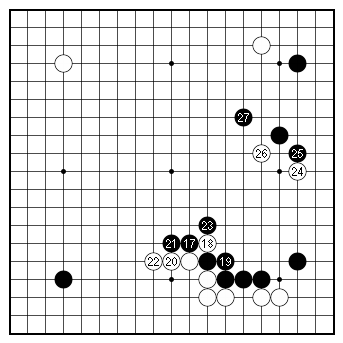 Figure 4 (17–27). Enticement to invade |
Figure 4 (17–27). Enticement to invade White ataries with 18, then extends to 20. After 21, White can't allow Black to hane at 22 (the head of two stones), so he has to play there himself. With 23, Black captures the stone at 18, ending up with a large-scale moyo on the right side. As Shibano emphasizes in his books on Go and AI, your aim in staking out a moyo is not to secure territory; rather, your aim is to entice the opponent to invade. When he does invade, you have a numerical advantage, so the opponent will have a weak group that you can attack. This is the strategy Black followed in this game: White invades with 24; Black attaches with 25; White jumps lightly into the center with 26; Black keeps up the pressure with 27. |
 Dia. 1. Casting a net |
Dia. 1. Casting a net By the way, when White plays 24 and 26 in Figure 4, he is not thinking of these moves as affecting the ladder starting with 23. In fact, Black doesn't need the ladder to capture. If White tries to run away with 1, Black captures in a net with 2 and 4. |
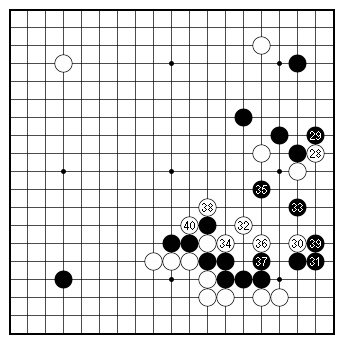 Figure 5 (28–40). Continuation |
Figure 5 (28–40). Continuation Continuing from Figure 4, White plays two forcing moves with 28 and 30, then strikes at the key point of 32. Black invades with 33 and White rescues his stones in the center with 34 to 40. At this point the AI monitoring this game judges position as favorable for White. The result: 288 moves. White won by resignation. The move-by-move game record can be found at Anzai vs. Ueno |
 Dia. 2. One-space jump |
Dia. 2. One-space jump After White pulls back with 1, jumping to Black 2 would be more severe than the knight's move of 35 in Figure 5. With the moves to 9, White has neutralized the three black stones in the center while strengthening his own, but his three stones on the right side look rather forlorn. |