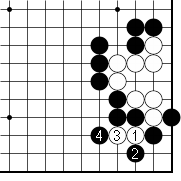
 Dia. 1. Correct |
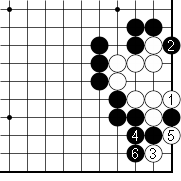
Dia. 1. The cut The cut of White 1 is Black's only defect. If Black ataries with 2, White must increase the sacrifice to two stones with 3. These are the key moves. After Black 4 — |
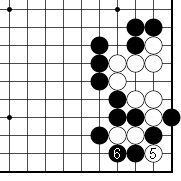 Dia. 2 |
Dia. 2. Forcing Black to capture White ataries with 5, forcing Black to capture with 6. |
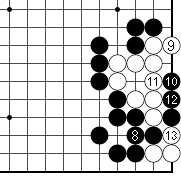
 Dia. 3 |
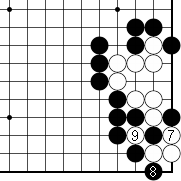
Dia. 3. Two descents White now descends to 7, then, after Black 8, plays another descent at 9. White's group is now set up to make two eyes. Instead of 8 — |
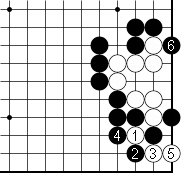
 Dia. 4 |
Dia. 4. White gets two eyes If Black tries to kill the white group by connecting at 8 and making a placement at 10, White will answer by descending to 9 and connecting at 11, making an eye. If Black now connects at 12, White 13 ataries three stones. When White captures them, he will have made his second eye. |
 Dia. 5 |
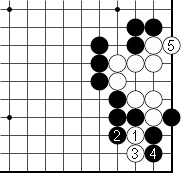
Dia. 5. Short of liberties After the exchange of 1 for Black 2, White must not omit the sacrifice of 3 in Dia. 1 and immediately atari at 3. After White descends to 5, Black will play a hane at 6. Next — |
 Dia. 6 |
Dia. 6. A ko When White cuts at 7, Black ataries with 8. But when White captures at 9, the result is a ko. |
 Dia. 7 |
Dia. 7. Variation Instead of 6 in Dia. 5, White must not play a hane with 6 as in this diagram. White descends to the key point of 7 and, just as in Dia. 4, captures three stones and gets two eyes. |
 Dia. 8 |
Dia. 8. Failure White 1 fails, After Black hanes with 2, White has no way to make two eyes. The clamp of White 3 looks like a tesuji, but it also fails. After Black 4 and 6, White has no way to make two.eyes |
 Dia. 9 |
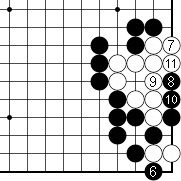
Dia. 9. Variation What happens if Black answers White 1 with an atari from the left with 2? White will again increase the sacrifice to two stones by descending to 3. Black blocks with 4 and White again plays the key descent of 5. Next — |
 Dia. 10 |
Dia. 10. Continuation As in Dia. 7, Black tries to prevent White from making two eyes with 6 and 8, but, after 10, he finds his stones short of liberties when White ataries with 11. |
|
Sacrificing stones often leads to sequences that are hard to read out, especially after some stones are captured and the opponent makes a recapture. This can transform the entire nature of a position. When such positions arise in games, a player can't analyze them by moving the stones around on the board. Instead, he must analyze the position in his head. And this is how one should solve life-and-death problems: visualize the position in your head and solve them there.
A few years ago I wrote an essay on this topic, Increasing Your Concentration and Powers of Analysis through Visualization. Perhaps some of my readers will find this essay useful. |