 Dia. 1 |
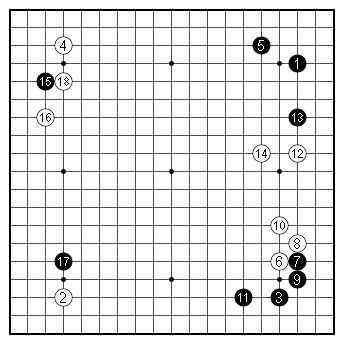
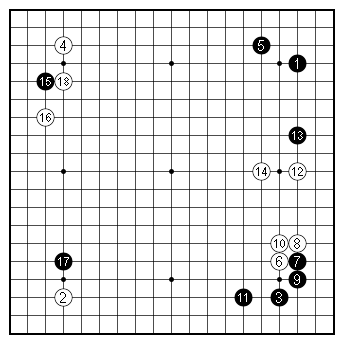
Dia. 1. A basic joseki Here are the moves that led up to the position in the problem diagram. The moves from White 6 to 14 is a basic joseki. |
 Dia. 2 |
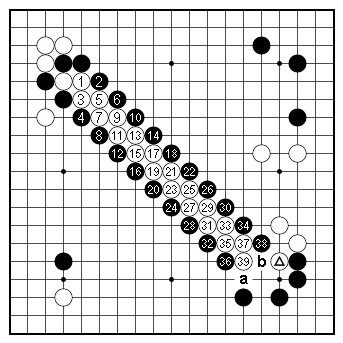
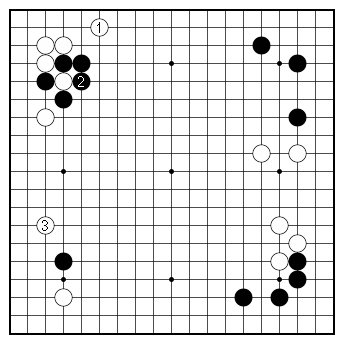
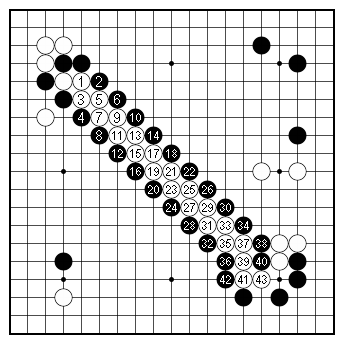
Dia. 2. White misreads the ladder After Black 5 in the problem diagram, White might believe the ladder is favorable and runs away with the moves to 39, thinking that Black would now play 'a'–White 'b' and he would have linked up to the marked stone. However — |
 Dia. 3 |
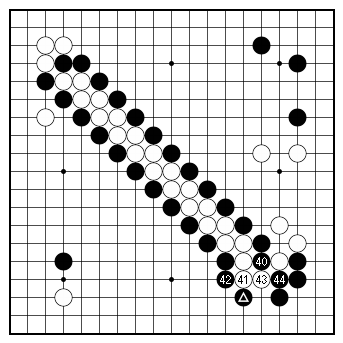
Dia. 3. Redirecting the ladder Black would redirect the ladder by pushing down with 40, and force White to run into the marked stone with 41. Black now ataries with 42. After Black 44, White has no way to escape capture. |
 Dia. 4 |
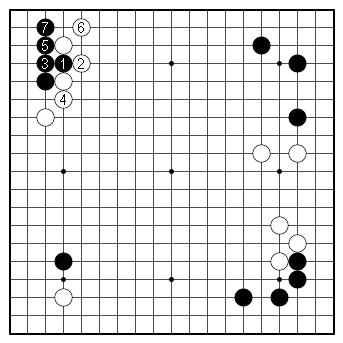
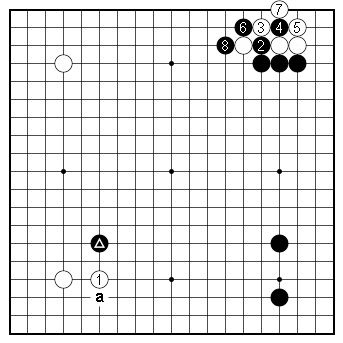
Dia. 4. Avoiding the ladder Going back to the problem diagram, instead of playing the atari of White 2 underneath, White should atari from above with 2 to avoid the unfavorable ladder. The moves to Black 7 are a joseki. Black secures the corner while White gets outside influence in sente. |
 Dia. 5 |
Dia. 5. A thick ponnuki Since the ladder is unfavorable for White, he should simply slide to 1. Because of all the bad aji that an unresolved ladder entails, Black should immediately capture with 2. This gives White another good move at 3. However, Black is satisfied with this result because the thick ponnuki he has made dominates the left side. |
 Dia. 6 |
Dia. 6. A joseki variation Instead of 10 in Dia. 1, White 10 here is another variation of this joseki. If White chooses to play this way, then the ladder doesn't work. That is — |
 Dia. 7 |
Dia. 7. The ladder collapses After Black pushes in with 40 and ataries with 42, White 43 ataries two stones, and the ladder collapses. |
 Dia. 8 |
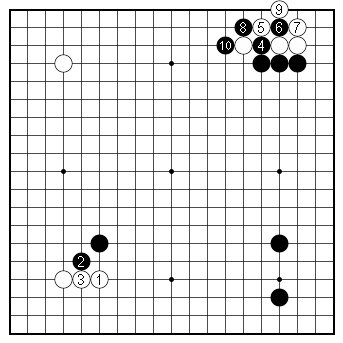
Dia. 8. An unusual opening move Here is a game in which Yamashita Keigo makes a rather unusual opening move. After Black makes an enclosure with 5, White invades at the 3–3 point with 6. The moves to White 10 is the start of a joseki, but suddenly Black switches to the opposite corner and plays at 11 on the 6–6 point. What is going on here? There seems to be a ladder involved. |
 Dia. 9 |
Dia. 9. The ladder Locally, answering the marked stone with White 1 is a logical move. It prevents Black from playing at 'a' and staking out a large sphere of influence at the bottom in conjunction with his enclosure in the lower right corner. But Black now sets up a ladder with the moves to 8. At first glance, it might seem that the marked stone is in the path of this ladder, but — |
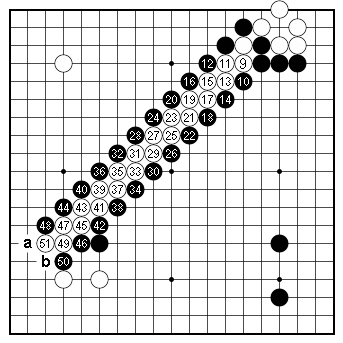 Dia. 10 |
Dia. 10. The ladder collapses Suppose White runs away with 9. If Black continues to chase him with 10 to 50, White plays 51 and Black cannot capture the white stones. If Black 'a', White ataries at 'b'; if Black 'b', White descends to 'a'. In both cases the ladder collapses. What happened? Did Yamashita misread the ladder? Or does Black 11 in Dia. 8 have some other meaning? |
 Dia. 11 |
Dia. 11. Apparently, White takes the threat of this ladder seriously, He defends against it with 12. Is he also misreading the ladder, or is he just being cautious? What's happening here? Let's go back to White 1 in Dia. 9. |
 Dia. 12 |
Dia. 12. The peep After White 1, Black will peep at 2. If White connects at 3, Black will set up the ladder with 4 to 10. What is the status of the ladder now? |
 Dia. 13 |
Dia. 13. White is captured. If we play out the ladder from 11, we see that after White 47, Black can redirect the white stones towards the marked stone with 48 and White is captured. |
 Dia. 14 |
Dia. 14. The peep If White ignores the peep and defends the top with 3, Black will cut through with 4 and 6, sacrifice two stones with 12 and 14, and make a thick position with 16. This thickness works well in conjunction with the two-space enclosure on the right. |
 Dia. 15 |
Dia. 15. Variation Instead of White 1 in Dia. 9, White might jump to 1 on the left side. Black attaches at 2 and, if White answers with 3, Black will cut at 4. This could turn into a messy fight with White trying to defend his position in the lower left corner while preventing Black from setting up a favorable ladder. By immediately playing 12 in Dia. 11, White avoids all these complications. |
 Dia. 16 |
Dia. 16. Joseki After White plays 10 in Dia. 8 (the marked stone), Black often continues by pressing with 1. He then cuts through with 3 and 5. White connects with 6 and Black plays the nose attachment tesuji with 7. White continues with 8 and 10. This is a joseki. |
|
Recommended reading Ladders are such a basic tactic that there is little instructional material about them, except in passing. This is unfortunate because ladders are strategically important and they can become quite tricky. Fortunately, in John Power's massive book Essential Go Proverbs, there is a section that will guide you through the complexities of ladders, providing principles, examples, and problems. (See pages 57–77) You will also find a chapter on ladders and nets in Kageyama's popular book Lessons in the Fundamentals of Go. |