 Dia. 1. Correct |
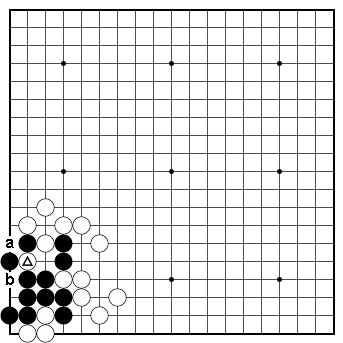
Dia. 1. The atekomi tesuji Black 1, played at the vertex of the diagonally placed marked stones, is the atekomi tesuji. It is the only move that enables Black to get a second eye and live. |
 Dia. 2 |
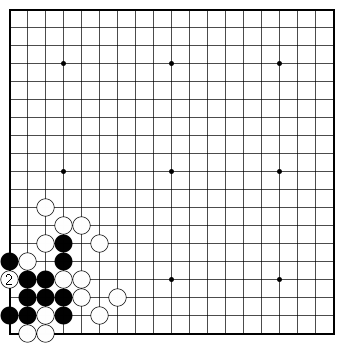
Dia. 2. White's atari fails. If White ataries with 2, Black captures two stones with 3 and Black is alive. That is — |
 Dia. 3 |
Dia. 3. A second eye If White captures at 'a', Black connects at 'b' for his second eye. If White 'b', Black captures the marked stone. |
 Dia. 4 |
Dia. 4. A mistake Capturing two stones with Black 1 is a mistake. Next — |
 Dia. 5 |
Dia. 5. The thrown-in tesuji White will throw in a stone at the key point of 2, robbing Black of his second eye. However, the position here is a bit more complicated. Next — |
 Dia. 6 Black 9: at the marked stone |
Dia. 6. A ko Black can atari at 3 and play the moves to 7. After White turns with 8, Black can capture at the marked stone and start a ko. The bottom line is that Black can avoid this complication by simply playing the atekomi of 1 in Dia. 1. |
|
Recommended reading For the novice player who aspires to reach dan-level strength, the best book for studying tesujis is A Survey of the Basic Tesujis. It presents 38 tesujis, each one introduced with a simple example, followed by a number of straightforward, uncomplicated, kyu-level problems. Of course the atekomi tesuji is included, with one example followed by six problems. If you are a kyu-level player, diligent study of this book will increase your fighting strength in the middle game by two or more handicap stones. |